 Add to Favourites
 Print this Article
This section covers certificate installation requirements, how to use the server's shared certificate, creating a self-signed certificate, and installing a purchased certificate. Any site that processes monetary transactions or takes in sensitive information (such as passwords) needs the protection of a SSL certificate.
Certificate Installation Requirements
In order to use the SSL feature your site must have it's own static (dedicated) IP address. If you don't have a dedicated IP address, you will get an error message when you access the SSL menu:
Could not execute your request
Details: You are not allowed to modify your SSL
Contact us for information on obtaining a dedicated IP address as they come at an additional cost.
Why do I need a dedicated ip?
The reason you must have your own IP address when you want to use your own SSL certificate (when you don't want the server wide shared certificate) is because of the way SSL and apache (httpd) works.
For name based webhosting (when many domains are on one IP) the web browser will pass the name of the domain being requested inside the httpd headers along with the request. This way, apache knows which domain you are trying to access even though there are many domains on that one IP address.
When you do the same thing through an SSL connection, the connection has to be made *before* the request can be sent. In this connection, the certificate is passed. The only information that apache knows before the request is made is which IP the connection is being made to. It has to be able to know which certificate to send before the request is made, thus you can't use mutiple certificates on the same IP (if you do, apache will use the first certificate listed which DA will always set to the server shared certificate for shared IPs).
If you want to use your own certificate, it must be the first certificate listed. This wouldn't work for a shared IP, because there would multiple domains wanting this status, and the first certificate would the one shown. For this resaon the shared certificate is always used on a shared IP. For your certificate, DA will aknowledge the IP as being 'owned' and will remove the server shared certificate as the first cert to be loaded, thus your certificate will be loaded instead.
Triple DES certificates don't work through DirectAdmin.
Server's Shared and Self-Signed Certificates
You may use the server's built-in certificate or generate a self-signed certificate free of charge. The requirements are:
- a dedicated IP address
- SSL access (all of our plans above the Mini have this)
- an understanding of non-trusted certificates (see the sections on shared and self-signed certificates below)
Purchased Certificates
Purchased certificates require:
- a dedicated IP address
- SSL access (all of our plans above the Mini have this)
- an understanding of purchasing/installing trusted certificates (see the section on purchased certificates below)
Using the Server's Shared Certificate
One of the simplest ways to have a secure site is to use the server's built-in self-generated certificate. To access the SSL menu, click on the "Advanced Tools" link from the main control panel menu, then click the "Install SSL Certificates" icon.

Make sure the radio button next the "User the server's certificate" is selected, and click the "Save" button at the bottom of the screen.
Understanding non-Trusted Certificates
Although non-Trusted certificates provide a high level of encryption, they are not always the best choice because they are self-generated instead of purchased from a trusted authority. Because of this, visitors to your site may receive a warning popup window when they access a secure page:
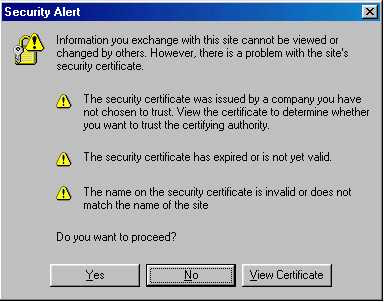
If you can put up with this inconvenience, then a self-generated secure certificate is adequate for your site. If you are a company selling goods or services, we highly recommend that you purchase a trusted certificate. A non-trusted certificate may be harmful to a web site's reputation.
Uploading Files to your Secure Site
All secure files need to be uploaded to the /domains/domain.com/private_html directory. You may upload using the control panel's built-in file manager or FTP. For example,
/domains/domain.com/private_html/index.html ---> https://www.yourdomain.com/index.html
/domains/domain.com/private_html/secure/index.html ---> https://www.yourdomain.com/secure/index.html
The private_html directory operates the exact same way as the public_html directory.
Note: You will not see a private_html directory if the SSL feature isn't enabled on your account.
Creating a Self-Signed Certificate
An alternative to the self-generated shared server certificate is a personalized self-signed certificate. First, access the SSL menu by clicking the "Advanced Tools" link from the main control panel menu, then click the "Install SSL Certificates" icon.

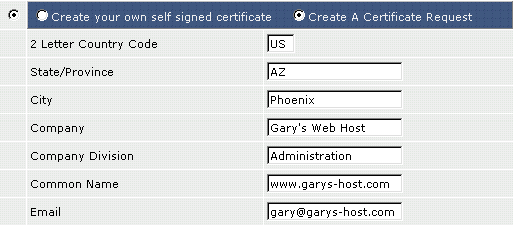
Step 1: Click the radio buttons to select "Create your own self signed certificate."
Step 2: Enter the information about yourself and your company.
The Common Name is the exact web address the certificate is associated with. In the above example, https://www.garys-host.com/anything would be valid, but not https://subdomain.garys-host.com.
Step 3: Click the "Save" button at the bottom of the screen. You will be taken back to the SSL menu.
Understanding non-Trusted Certificates
Although non-Trusted certificates provide a high level of encryption, they are not always the best choice because they are self-generated instead of purchased from a trusted authority. Because of this, visitors to your site may receive a warning popup window when they access a secure page:
If you can put up with this inconvenience, then a self-generated secure certificate is adequate for your site. If you are a company selling goods or services, we highly recommend that you purchase a trusted certificate. A non-trusted certificate may be harmful to a web site's reputation.
Uploading Files to your Secure Site
All secure files need to be uploaded to the /domains/domain.com/private_html directory. You may upload using the control panel's built-in file manager or FTP. For example,
/domains/domain.com/private_html/index.html ---> https://www.yourdomain.com/index.html
/domains/domain.com/private_html/secure/index.html ---> https://www.yourdomain.com/secure/index.html
The private_html directory operates the exact same way as the public_html directory.
Note: You will not see a private_html directory if the SSL feature isn't enabled on your account.
Installing a Purchased Certificate
A purchased certificate is the best form of security. Because the certificate is both secure and trusted, visitors will not receive a warning popup window when viewing a secure page.
Note: A dedicated (static) IP address is required for the installation of a purchased certificate.
Step 1: Generate a CSR
First, access the SSL menu by clicking on the "Advanced Tools" link from the main control panel menu, then click the "Install SSL Certificates" icon.
Make sure to click the radio button next to "Create A Certificate Request." Then, enter the information about your company. The "Common Name" refers to the address of your site that will go on the SSL certificate. Your site will be secure only at this address. In the above example, https://www.garys-host.com/anything would be secure, but not https://garys-host.com/anything.
When you are finished, click the "Save" button at the bottom of the screen. You will then see a page that looks like this:
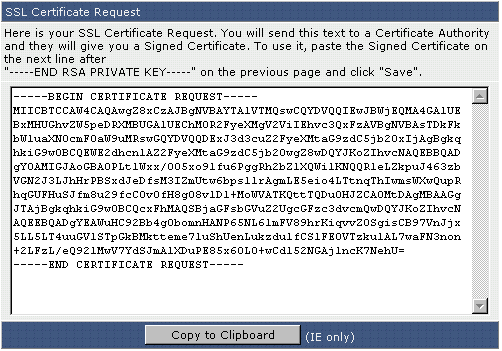
Copy this text (including the "BEGIN/END CERTIFICATE REQUEST" sections) into a plain text editor such as Windows Notepad and save the file to your hard drive. You will need this CSR when you purchase a certificate.
Step 2: Purchase a Certificate
When purchasing a certificate, you will be asked about yourself or your company, your web site, and:
- the CSR
- the software that generated the CSR
- your common name
The CSR
Simply paste the CSR given to you by the control panel, including the "BEGIN/END CERTIFICATE REQUEST" sections. There will be a text box in the order form to paste to. Please ensure the CSR is saved and pasted as plain text.
Software that Generated the CSR
Choose Apache-ModSSL, or "Other" if you don't see Apache-ModSSL in the list. Do not worry about making a mistake, as this information is collected for statistics purposes only.
Your Common Name
The "Common Name" refers to the address of your site that will go on the SSL certificate (see Step 1). Enter this address without the "http://" unless otherwise specified by the certificate seller.
Step 3: Install the Certificate
Access the SSL menu by clicking on the "Advanced Tools" link from the main control panel menu, then click the "Install SSL Certificates" icon.
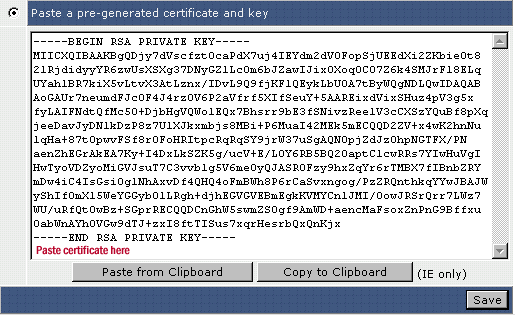
Select the radio button next to "Paste a pre-generated certificate and key." As you can see, the key is already inserted in the text box for you. Paste the certificate immediately below it and click "Save."
Step 4: Install the CA Root Certificate
Return to the main SSL menu. At the very bottom is a link called "Click Here to paste a CA Root Certificate. Click the link and paste your CA Root Certificate in the textbox. Then, click the "Save" button.
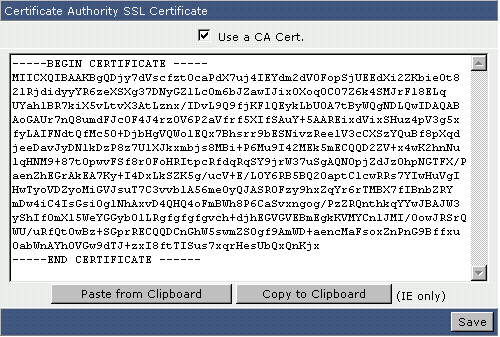
Important: Remember to check the "Use a CA Cert." box.
Although the installation of a CA Root Certificate is not always required, you may find that your SSL certificate will not function properly without completion of this step.
Uploading Files to your Secure Site
All secure files need to be uploaded to the /domains/domain.com/private_html directory. You may upload using the control panel's built-in file manager or FTP. For example,
/domains/domain.com/private_html/index.html ---> https://www.yourdomain.com/index.html
/domains/domain.com/private_html/secure/index.html ---> https://www.yourdomain.com/secure/index.html
The private_html directory operates the exact same way as the public_html directory.
Note: You will not see a private_html directory if the SSL feature isn't enabled on your account.
